Close

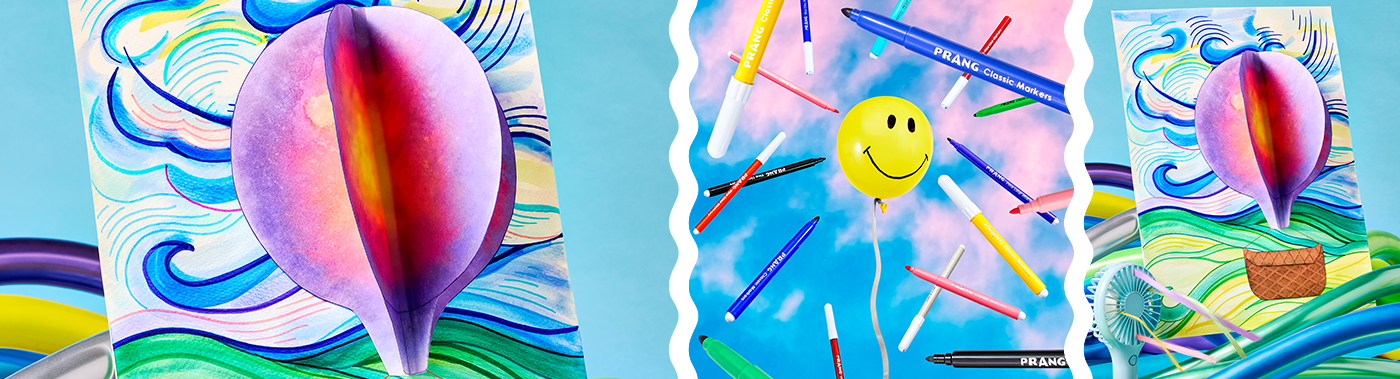
Capture the Wind
Lesson Plan, Grades 1-8, Art History, Science, Prang, Collage, Painting
Description
Lesson Plan and Artwork by Heather Gregory
Capturing the movement of wind in artwork is certainly challenging, because wind itself is not visible. You can only feel its effect and see its force on objects. Repeating elements, using directional and expressive brushwork, and contrasting warm with cool colors are all effective ways to create the illusion of wind in a composition. This project uses simple materials from Prang® in innovative ways, which stretches both creative skills AND art room budgets!
Objectives
- Investigate the work of various artists who have illustrated wind in their own ways. Analyze the techniques they each used to create the illusion of wind.
- Experiment with the use of markers as a painting medium.
- Create a symmetrical 3D balloon to fly through a windswept landscape. The collaged painting will use repetition, directional brushwork, and color temperatures to illustrate the wind.
Supplies Needed
Prang® Classic Art Markers, Fine line, Set of 144
Prang® Classic Art Markers, Bullet Tip, Set of 12
Prang® Medium Weight Construction Paper, 9" x 12", Light Brown
Sax® Watercolor Pad, White, 90 lb, 11" x 15", 24 Sheets
Sax® Bristilina White Konex Paint Brushes, Set of 6
Sax® Sulphite Drawing Paper, Extra-White, 80 lb, 12" x 18", 500 Sheets
Coffee Filter Paper, 20 cm Dia, Pack of 50
Tacky Glue, 4 oz
Marvy Corru-Gator Plastic Paper Crimper, Diamond Pattern, 8½"
*Here are the supplies needed for this lesson plan for reference. Find a convenient carousel of shoppable products for this lesson below.
Standards
Standard #1: Generate and conceptualize artistic ideas and work.
Standard #2: Organize and develop artistic ideas and work.
Standard #3: Refine and complete artistic work.
Standard #7: Perceive and analyze artistic work.
Instructions
1
Analyze and discuss works by artists who have illustrated wind in different ways. The modern 3D sculptures of Janet Echelman, A Gust of Wind by Gaetano Bellei (1902), The Great Wave off Kanagawa by Hokusai (1831), and of course the many swirled paintings by Vincent Van Gogh are all excellent examples to investigate.
2
Identify how these artists used repetition, directional brushwork, or color temperatures to illustrate the implied (or in some cases, actual) movement of wind.
3
Give students time to sketch a plan for their own windswept landscape. The paper should be vertical and the land itself should be minimal, with plenty of space left in the sky portion of the composition. A guided drawing lesson may also help reluctant student artists.
4
Direct students to lightly sketch their landscape onto watercolor paper using pencil. Directional lines may be lightly sketched to guide later paint brushstrokes.
5
Create “palettes” by laminating 9" x 12" white drawing paper.
6
Distribute “palettes” and have students scribble large “blobs” of Prang Classic Markers onto the lamination to create a palette of color. If necessary, simplify and create a palette for the land portion first. Then, wipe the palette with a paper towel and add new colors for the sky.
7
Demonstrate how to dip brushes into water and then blend into the Prang Classic Markers to create faux paint. The “paint” can then be used in ways similar to traditional watercolor. When more paint is needed, wipe the lamination clean and dry with a paper towel, then apply more marker. Repeat as needed until the entire landscape is painted. Allow to dry.
8
Give each student a coffee filter to place on their cleaned laminated paper. Use Prang Classic Markers to fully saturate the filter with color, paying attention to color theory as the colors will bleed and blend into each other.
9
Fold a piece of 12" x 18" white drawing paper in half to create a crease. Unfold and wet the paper. Run under a faucet or submerge in water to make sure it is completely saturated.
10
Carefully place the colored coffee filter onto one side of the paper and fold the other side on top. Press and rub the paper thoroughly, then allow it to dry completely with the filter remaining inside.
11
Once dry, open the paper and remove the filter. This can be saved for a later project.
12
Fold the paper closed again. Define a circle shape with pencil and sketch the bottom “skirt” of the balloon onto the shape.
13
Keep the paper closed while cutting the balloon shape out. This will create 2 symmetrical balloons. Place them on top of each other, color sides facing up.
14
Fold the top balloon in half vertically. Add a line of glue vertically down the line of symmetry and attach the 2 balloon shapes together at their center. Once the glue is dry, fold the edges of the top balloon forward.
15
Cut a basket shape from Prang Construction Paper. Crimp the paper to add a woven texture.
16
Compose your pieces and attach with glue.
17
If desired, additional detail may be applied with markers or string.